Category: Spanish and Mediterranean

Spanish and Mediterranean dinner recipes focus on fresh ingredients, balanced flavors, seafood, grilled meats, rice dishes, and classic comfort foods inspired by coastal cooking traditions. This category includes paella, garlic shrimp, roasted meats, seafood dishes, and herb-forward Mediterranean meals.

These recipes emphasize olive oil, garlic, herbs, tomatoes, and slow-cooked flavors while keeping preparation approachable for home cooks. From Spanish tapas and Mediterranean seafood dishes to hearty roasted meals and rice-based recipes, each dish is designed to deliver vibrant flavor and satisfying texture.

Whether you are preparing a casual family dinner or exploring Mediterranean-inspired cuisine, this collection offers simple and flavorful recipes rooted in traditional Spanish and Mediterranean cooking.

  • Catalan Chicken with Prunes (Pollo a la Catalana)

    Catalan Chicken with Prunes (Pollo a la Catalana)

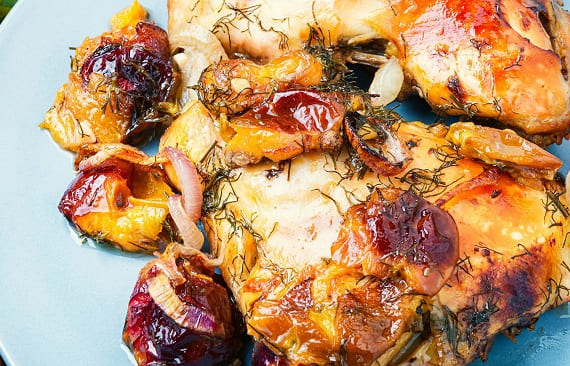
    Catalan Chicken with Prunes, also known as Pollo a la Catalana, is a traditional Spanish dish that perfectly balances sweet and savory flavors. This classic recipe from Catalan cuisine combines tender chicken with prunes, nuts, and a rich, slow-simmered sauce that delivers deep, comforting flavor. This style of cooking is typical of Catalan cuisine, where sweet and savory ingredients are often combined to create balanced and flavorful dishes.

    If you are looking for an authentic Catalan Chicken with Prunes recipe that is easy to follow and delivers restaurant-quality results, this version is a reliable choice. The combination of garlic, onions, paprika, and white wine creates a savory base, while prunes add natural sweetness and complexity.

    This Catalan Chicken with Prunes recipe is perfect for family dinners, special occasions, or meal prep. It pairs beautifully with rice, bread, or vegetables, making it a versatile and satisfying meal.


    Table of Contents

    • Ingredients
    • How to Make Catalan Chicken with Prunes
    • Chef’s Notes
    • Serving Suggestions for Catalan Chicken with Prunes
    • Nutritional Information
    • Frequently Asked Questions

    Why This Catalan Chicken with Prunes Recipe Works

    The slow cooking process allows the chicken to absorb all the flavors of the sauce
    Prunes provide natural sweetness that balances the savory ingredients
    Simple pantry ingredients create a rich and complex dish
    This Catalan Chicken with Prunes tastes even better the next day
    The recipe is easy to prepare but feels elevated and unique


    Ingredients

    For the Chicken

    500g chicken (bone-in pieces preferred)
    3 tbsp olive oil
    Salt and pepper to taste

    For the Sauce

    1 large onion (chopped)
    4 cloves garlic (minced)
    1 small tomato (grated or finely chopped)
    1 tsp paprika
    1 bay leaf
    ½ cup white wine
    1 cup chicken broth

    For Flavor and Texture

    1 cup prunes (pitted)
    ¼ cup pine nuts or almonds

    For Garnish

    2 tbsp fresh parsley (chopped)


    How to Make Catalan Chicken with Prunes

    Step 1: Brown the chicken

    Heat olive oil in a large pan over medium heat. Season the chicken with salt and pepper, then cook until golden brown on all sides. This step builds the foundation of flavor. Remove and set aside.

    Step 2: Prepare the base

    In the same pan, sauté chopped onions until soft. Add garlic and cook for another minute until fragrant.

    Step 3: Add tomatoes and spices

    Add grated tomato, paprika, and bay leaf. Cook until the mixture thickens slightly and becomes aromatic.

    Step 4: Deglaze with wine

    Pour in the white wine and let it simmer for 2–3 minutes so the alcohol cooks off and the flavors concentrate.

    Step 5: Simmer the chicken

    Return the chicken to the pan and add chicken broth. Cover and simmer on low heat for about 20 minutes until the chicken becomes tender.

    Step 6: Add prunes and nuts

    Add prunes and pine nuts or almonds. Continue cooking for another 10–15 minutes until the sauce thickens and the flavors combine.

    Step 7: Finish and serve

    Sprinkle fresh parsley over the Catalan Chicken with Prunes and serve hot with your preferred side.


    Chef’s Notes

    Bone-in chicken gives the best flavor and keeps the meat juicy
    If prunes are dry, soak them in warm water before using
    Pine nuts provide a softer texture, while almonds add a slight crunch
    Let the Catalan Chicken with Prunes rest before serving to enhance flavor
    This dish develops even deeper flavor when reheated the next day


    Serving Suggestions for Catalan Chicken with Prunes

    Serve Catalan Chicken with Prunes with:

    steamed white rice
    mashed potatoes
    crusty bread
    couscous or quinoa
    roasted vegetables

    These options help absorb the rich sauce and create a complete meal.


    Nutritional Information (Approx. per serving)

    Calories: 400–500 kcal
    Protein: 28–32g
    Carbohydrates: 20–25g
    Fat: 20–25g
    Fiber: 3–5g
    Sodium: 500–700mg

    Note: Values may vary depending on ingredients used.


    Frequently Asked Questions

    Can I use boneless chicken in Catalan Chicken with Prunes?

    Yes, but bone-in chicken provides more flavor and better texture.

    Are prunes necessary for Catalan Chicken with Prunes?

    Yes, prunes are essential to achieve the signature sweet and savory taste.

    Can I substitute white wine in Catalan Chicken with Prunes?

    You can use chicken broth with a small amount of lemon juice as an alternative.

    What can I serve with Catalan Chicken with Prunes?

    Rice, mashed potatoes, or crusty bread pair very well with this dish.

    Can I store Catalan Chicken with Prunes?

    Yes, store it in the refrigerator for up to 2–3 days and reheat gently before serving.


    Common Mistakes to Avoid

    Skipping the browning step, which reduces flavor
    Using too much liquid, preventing the sauce from thickening
    Overcooking the chicken, which can make it dry
    Not adjusting seasoning to balance sweetness and saltiness


    Storage and Reheating

    Store Catalan Chicken with Prunes in an airtight container in the refrigerator for up to 3 days.

    For best results:

    reheat in a pan over low heat
    add a small amount of broth if needed
    avoid overheating to maintain texture


    Final Thoughts

    Catalan Chicken with Prunes (Pollo a la Catalana) is a traditional Spanish recipe that brings together simple ingredients to create a rich and satisfying dish. The balance of savory chicken, sweet prunes, and a flavorful sauce makes it both comforting and unique.

    This Catalan Chicken with Prunes recipe is simple to make and full of flavor, ideal for anyone who wants to explore Mediterranean flavors while keeping cooking simple and approachable. Once you try it, it can easily become part of your regular meal rotation.


    Related Recipes You’ll Love

    If you enjoyed this classic Catalan chicken with prunes recipe, try this popular dinner idea next:

    – Orange Chicken


    Explore More Chicken Dinner Recipes

    Discover more easy and flavorful chicken dinner ideas below:

    – Chicken Dinner Recipes


    Explore More Easy Dinner Recipes

    – Easy Dinner Recipes


    Author Note

    Dinners Recipe Team shares simple, reliable recipes designed for home cooks. Our goal is to make cooking easier while delivering flavorful, satisfying meals.

  • Paella Valenciana Recipe

    Paella Valenciana Recipe

    Paella Valenciana recipe is a traditional Spanish rice dish made with broth, meat, seafood, vegetables, and saffron. This paella Valenciana recipe combines bold flavors with simple cooking techniques to create a satisfying meal.

    This paella Valenciana recipe uses chicken, chorizo, shrimp, mussels, and squid to build a balanced and flavorful dish, with rice that absorbs the broth while developing a lightly crisp bottom layer known as socarrat. This dish is a classic example of Spanish cuisine, known for its bold flavors and traditional cooking methods.


    Table of Contents

    • Ingredients
    • How to Make Paella Valenciana Recipe
    • Pro Tips for Best Results
    • Serving Suggestions for Paella Valenciana
    • Nutritional Information
    • Frequently Asked Questions


    Why This Paella Valenciana Recipe Works

    This paella Valenciana recipe is designed to create rich flavor while keeping the rice properly textured.

    • Short-grain rice absorbs flavor without becoming mushy
    • Saffron adds color and aroma
    • Meat and seafood create a balanced dish
    • A wide pan helps the rice cook evenly


    Ingredients

    For the Base

    • 2 cups short-grain rice (Bomba or Arborio)
    • 4 cups chicken broth or seafood stock
    • 2 tablespoons olive oil
    • 1 onion, finely chopped
    • 4 cloves garlic, minced
    • 2 tomatoes, grated
    • 1 teaspoon smoked paprika
    • Pinch of saffron (soaked)
    • Salt and pepper

    Meat

    • 200 g chicken thighs
    • 100 g chorizo

    Seafood

    • 150 g shrimp
    • 150 g mussels
    • 100 g squid

    Vegetables

    • Red bell pepper
    • Green beans
    • Peas

    Garnish

    • Lemon wedges
    • Parsley


    How to Make Paella Valenciana Recipe

    Step 1: Brown the Meat

    Cook chicken until browned, then add chorizo.

    Step 2: Build the Base

    Cook onion, garlic, tomatoes, and paprika.

    Step 3: Add Rice and Broth

    Add rice, broth, and saffron. Stir once, then do not stir again.

    Step 4: Add Vegetables

    Spread vegetables evenly.

    Step 5: Add Seafood

    Place seafood on top halfway through cooking.

    Step 6: Finish Cooking

    Cook until liquid is absorbed and rice is tender. Increase heat slightly at the end.

    Step 7: Rest and Serve

    Let rest for 5 minutes, then garnish and serve.


    Pro Tips for Best Results

    • Use a wide pan
    • Do not stir after adding broth
    • Use saffron for best flavor
    • Let the dish rest before serving


    Serving Suggestions for Paella Valenciana

    This paella Valenciana recipe pairs well with hearty dishes like this Classic American Meatloaf for a complete meal plan.

    Serve with:

    • Lemon wedges
    • Simple salad
    • Crusty bread

    This paella Valenciana recipe works well as a centerpiece meal.


    Nutritional Information (Approx. per serving)

    Calories: 500–600 kcal
    Protein: 30–35g
    Carbohydrates: 45–55g
    Fat: 20–25g
    Sodium: Moderate


    Storage and Reheating

    Store in the refrigerator for up to 2 days.

    For best results:

    • Reheat in a pan
    • Add a small amount of broth if needed


    Frequently Asked Questions

    Can I use basmati rice?

    Short-grain rice works best.

    Can I make it without seafood?

    Yes, use chicken and vegetables.

    What is socarrat?

    The crispy rice layer at the bottom.


    How to Achieve the Perfect Socarrat

    The socarrat is a key feature of this paella Valenciana recipe.

    Avoid stirring after adding broth. Increase heat slightly at the end to create a light crisp. A gentle crackling sound indicates proper formation.


    Choosing the Right Rice for Paella

    This paella Valenciana recipe depends on the correct rice.

    Short-grain rice absorbs liquid while maintaining structure. Long-grain rice is not ideal.


    Balancing Flavors and Ingredients

    This paella Valenciana recipe combines meat, seafood, and vegetables.

    Using a flavorful broth is essential. Saffron adds aroma and color. Seasoning should be balanced carefully.


    Variations You Can Try

    • Seafood-only version
    • Meat-only version
    • Vegetarian version


    Common Mistakes to Avoid

    • Stirring the rice
    • Using too much liquid
    • Uneven heat
    • Skipping resting time


    Make-Ahead and Storage Tips

    This paella Valenciana recipe is best fresh but can be stored.

    • Store up to 2 days
    • Reheat gently


    Final Thoughts

    This paella Valenciana recipe is a flavorful and balanced dish that brings together rice, meat, and seafood in one satisfying meal.


    Related Recipes You’ll Love

    – Catalan Chicken with Prunes
    Chicken Cacciatore
    – Grilled Sardines
    – Classic American Meatloaf


    Explore More Easy Dinner Recipes

    Discover more quick and simple meal ideas for any night:

    – Easy Dinner Recipes


    Author Note

    Dinners Recipe Team shares simple, reliable recipes designed for home cooks. Our goal is to make cooking easier while delivering flavorful, satisfying meals.

  • Grilled Sardines Recipe

    Grilled Sardines Recipe

    Grilled sardines recipe is a simple Mediterranean seafood dish made with fresh sardines, olive oil, sea salt, and lemon. This grilled sardines recipe cooks quickly and develops crisp skin with tender, flavorful flesh.

    This grilled sardines recipe focuses on keeping things simple, allowing the natural flavor of the fish to stand out with just a few basic ingredients. This dish is a staple of Mediterranean cuisine, known for its simple ingredients and fresh flavors.


    Table of Contents

    • Ingredients
    • How to Make Grilled Sardines Recipe
    • Pro Tips for Best Results
    • Serving Suggestions for Grilled Sardines
    • Nutritional Information
    • Frequently Asked Questions


    Why This Grilled Sardines Recipe Works

    This grilled sardines recipe is designed to highlight natural flavor while achieving a perfect texture.

    • High heat creates crisp skin
    • Minimal seasoning keeps flavor clean
    • Olive oil prevents sticking
    • Lemon adds brightness


    Ingredients

    • 8–10 fresh sardines, cleaned
    • 2–3 tablespoons olive oil
    • Coarse sea salt
    • 1 lemon
    • Fresh parsley (optional)


    How to Make Grilled Sardines Recipe

    Step 1: Prepare the Sardines

    Rinse and pat dry.

    Step 2: Season

    Brush with olive oil and sprinkle with salt.

    Step 3: Preheat the Grill

    Heat to medium-high and oil grates.

    Step 4: Grill

    Cook for 2–3 minutes per side until crisp and cooked through.

    Step 5: Serve

    Serve immediately with lemon and parsley.


    Pro Tips for Best Results

    • Use very fresh sardines
    • Do not overcook
    • Use a grill basket if needed
    • Charcoal adds extra flavor


    Serving Suggestions for Grilled Sardines

    Serve with:

    • Salad
    • Roasted vegetables
    • Crusty bread
    • Rice

    This grilled sardines recipe pairs well with classic dishes like this Paella Valenciana for a complete Mediterranean-style meal.


    Nutritional Information (Approx. per serving)

    Calories: 250–300 kcal
    Protein: 20–25g
    Carbohydrates: 0–5g
    Fat: 15–20g
    Sodium: Moderate


    Storage and Reheating

    Grilled sardines are best served fresh.

    • Store up to 1 day
    • Reheat gently if needed


    Frequently Asked Questions

    Can I cook sardines in a pan?

    Yes, but grilling adds better flavor.

    Are sardine bones edible?

    Small bones are soft and often edible.


    How to Choose the Freshest Sardines

    Freshness is critical in this grilled sardines recipe.

    Look for clear eyes, firm flesh, and a clean smell. Avoid fish that appear dull or overly soft.


    How to Achieve Perfect Grilling Results

    This grilled sardines recipe cooks quickly.

    Preheat the grill properly and cook over medium-high heat. Avoid overcooking to keep the fish tender.


    Enhancing Flavor with Simple Ingredients

    This grilled sardines recipe relies on simplicity.

    Olive oil, salt, and lemon enhance the natural taste without overpowering it.


    Variations You Can Try

    • Marinate with garlic and lemon
    • Add chili flakes
    • Serve with tomatoes or olives


    Common Mistakes to Avoid

    • Overcooking
    • Not preheating grill
    • Using too much seasoning
    • Handling fish too much


    Make-Ahead and Storage Tips

    This grilled sardines recipe is best fresh.

    • Prep ahead if needed
    • Store up to 1 day


    How to Serve Grilled Sardines for a Complete Meal

    This grilled sardines recipe can be turned into a complete meal with just a few simple additions.

    Serving sardines with crusty bread allows you to enjoy the natural oils and juices from the fish. A fresh salad with tomatoes, cucumbers, and olive oil helps balance the richness while adding freshness.

    Rice or roasted potatoes can also be served alongside to make the meal more filling. These sides absorb the flavors well and create a more satisfying plate.

    For a more traditional Mediterranean-style meal, consider adding olives, grilled vegetables, or a light yogurt-based sauce on the side.

    By combining simple sides with this grilled sardines recipe, you can create a balanced and flavorful meal without adding much extra preparation time.


    Final Thoughts

    This grilled sardines recipe is a simple and flavorful way to enjoy fresh seafood with minimal preparation.


    Related Recipes You’ll Love

    – Catalan Chicken with Prunes
    – Paella Valenciana
    – Chicken Cacciatore


    Explore More Easy Dinner Recipes

    Discover more quick and simple meal ideas for any night:

    – Easy Dinner Recipes


    Author Note

    Dinners Recipe Team shares simple, reliable recipes designed for home cooks. Our goal is to make cooking easier while delivering flavorful, satisfying meals.

  • Spanish Chicken Empanadas Recipe – Easy Tips for Flaky, Savory Pastries

    Spanish Chicken Empanadas Recipe – Easy Tips for Flaky, Savory Pastries

    Spanish chicken empanadas recipe is a classic dish made with flaky pastry filled with seasoned chicken and vegetables. This Spanish chicken empanadas recipe is easy to prepare and works well as a snack, appetizer, or light meal.

    This Spanish chicken empanadas recipe uses a simple dough and flavorful filling that can be baked or fried depending on your preference. With the right technique, you can achieve a tender crust and a balanced, savory filling that holds together well.

    This dish is commonly found in Spanish cuisine and is known for its versatility and portability.


    Table of Contents

    • Ingredients
    • How to Make Spanish Chicken Empanadas Recipe
    • Pro Tips for Best Results
    • Serving Suggestions for Spanish Chicken Empanadas
    • Nutritional Information
    • Frequently Asked Questions


    Why This Spanish Chicken Empanadas Recipe Works

    This Spanish chicken empanadas recipe is designed to create a balanced filling with a tender, flaky crust.

    • Simple filling delivers balanced flavor
    • Dough can be made ahead
    • Baking or frying adds flexibility
    • Easy to portion and serve


    Ingredients

    For the Dough

    • 2½ cups all-purpose flour
    • ½ cup cold butter
    • 1 egg
    • ½ teaspoon salt
    • ½ cup cold water

    For the Filling

    • 2 cups cooked chicken
    • 2 tablespoons olive oil
    • 1 onion
    • 3 cloves garlic
    • 1 red bell pepper
    • 1 tomato or ½ cup tomato sauce
    • 1 teaspoon paprika
    • ½ teaspoon cumin
    • Salt and pepper
    • Parsley

    For Assembly

    • 1 egg, beaten


    How to Make Spanish Chicken Empanadas Recipe

    Step 1: Make the Dough

    Mix flour, salt, and butter until crumbly. Add egg and water, then mix into a dough. Chill for at least 30 minutes.

    Step 2: Make Filling

    Cook onion, garlic, and peppers. Add chicken, tomato, and spices. Cook until thickened, then let cool completely.

    Step 3: Shape

    Roll dough and cut into circles. Add filling to the center.

    Step 4: Seal

    Fold over and press edges firmly with a fork.

    Step 5: Cook

    Bake at 350°F (180°C) for 20–25 minutes or fry until golden.

    Step 6: Serve

    Serve warm for best texture and flavor.


    Pro Tips for Best Results

    • Let filling cool before assembling
    • Do not overfill
    • Chill dough before rolling
    • Seal edges tightly to prevent leaks


    Serving Suggestions for Spanish Chicken Empanadas

    Serve with:

    • Salsa
    • Aioli
    • Salad

    This Spanish chicken empanadas recipe works well for snacks, appetizers, or light meals.

    This Spanish chicken empanadas recipe pairs well with flavorful dishes like this Catalan Chicken with Prunes for a complete meal.


    Nutritional Information (Approx. per serving)

    Calories: 300–400 kcal
    Protein: 15–20g
    Carbohydrates: 30–35g
    Fat: 15–20g
    Sodium: Moderate


    Storage and Reheating

    Store in the refrigerator for up to 3 days.

    For best results:

    • Reheat in oven
    • Freeze before cooking if needed


    Frequently Asked Questions

    Can I use store-bought dough?

    Yes, it works well and saves time.

    Can I make them vegetarian?

    Yes, use vegetables or beans instead of chicken.


    How to Get a Flaky and Tender Dough

    This Spanish chicken empanadas recipe depends heavily on proper dough technique.

    Using cold butter creates small pockets in the dough that produce a flaky texture during cooking. Handling the dough too much can make it tough, so it’s best to mix just until combined.

    Chilling the dough allows it to relax and makes it easier to roll out without shrinking. If using store-bought dough, letting it rest at room temperature briefly will improve workability.


    How to Keep the Filling Flavorful and Balanced

    The filling should be well-seasoned but not overly wet.

    Cooking the vegetables first helps develop a stronger base flavor. The chicken should be evenly mixed so each bite has a balanced taste.

    Allowing the filling to cool completely is important. Warm filling can soften the dough and make sealing more difficult. The goal is a moist but not watery filling.


    Variations You Can Try

    • Use beef or pork instead of chicken
    • Add olives, cheese, or boiled eggs
    • Increase spice level with chili flakes

    You can also experiment with baking or frying depending on your preference. Baking creates a lighter texture, while frying results in a crispier exterior.


    Common Mistakes to Avoid

    • Overfilling the empanadas
    • Not sealing edges properly
    • Using hot or watery filling
    • Skipping dough resting time


    Make-Ahead and Storage Tips

    This Spanish chicken empanadas recipe is ideal for preparing ahead.

    • Assemble and refrigerate before cooking
    • Freeze uncooked empanadas
    • Store cooked empanadas up to 3 days

    Reheat in the oven to maintain a crisp texture.


    How to Serve Empanadas as a Complete Meal

    This Spanish chicken empanadas recipe can easily become a full meal.

    Serve with a fresh salad, rice, or roasted vegetables to balance the richness of the pastry. Adding a dipping sauce such as aioli or salsa enhances both flavor and variety.

    For gatherings, empanadas can be served alongside multiple sides, allowing guests to mix and match flavors for a more complete dining experience.


    Final Thoughts

    This Spanish chicken empanadas recipe is a versatile and reliable option that works for both casual meals and gatherings.


    Related Recipes You’ll Love

    – Chicken Cacciatore
    – Catalan Chicken with Prunes
    – BBQ Chicken Pizza


    Explore More Chicken Dinner Recipes

    Discover more easy and flavorful chicken dinner ideas below:

    – Chicken Dinner Recipes


    Explore More Easy Dinner Recipes

    Discover more quick and simple meal ideas for any night:

    – Easy Dinner Recipes


    Author Note

    Dinners Recipe Team shares simple, reliable recipes designed for home cooks. Our goal is to make cooking easier while delivering flavorful, satisfying meals.

  • Gambas al Ajillo Recipe – Easy Tips for Garlic Shrimp with Bold Flavor

    Gambas al Ajillo Recipe – Easy Tips for Garlic Shrimp with Bold Flavor

    Gambas al ajillo recipe is a classic Spanish garlic shrimp dish made with shrimp, olive oil, garlic, and mild chili heat. This gambas al ajillo recipe cooks quickly and delivers bold flavor using just a few simple ingredients.

    This gambas al ajillo recipe focuses on simplicity while building deep flavor through garlic-infused oil and perfectly cooked shrimp. It’s ideal for quick meals, appetizers, or tapas-style serving.

    This dish is a staple of Spanish cuisine and is known for its rich aroma and simple preparation.


    Table of Contents

    • Ingredients
    • How to Make Gambas al Ajillo Recipe
    • Pro Tips for Best Results
    • Serving Suggestions for Gambas al Ajillo
    • Nutritional Information
    • Frequently Asked Questions


    Why This Gambas al Ajillo Recipe Works

    This gambas al ajillo recipe is designed to deliver strong flavor with minimal effort.

    • Shrimp cooks quickly and stays tender
    • Garlic-infused oil adds depth
    • Chili provides balanced heat
    • Simple ingredients make it reliable


    Ingredients

    • 300 g large shrimp, peeled
    • 5–6 cloves garlic, sliced
    • ¼ cup olive oil
    • 1–2 dried chilies or chili flakes
    • Salt
    • Parsley
    • Lemon juice (optional)
    • White wine (optional)


    How to Make Gambas al Ajillo Recipe

    Step 1: Heat the Oil

    Warm olive oil over medium heat.

    Step 2: Cook the Garlic

    Add garlic and cook until lightly golden.

    Step 3: Add Chili

    Add chilies and cook briefly.

    Step 4: Cook the Shrimp

    Add shrimp and cook 2–3 minutes per side.

    Step 5: Finish

    Add wine or lemon juice if desired, then parsley.

    Step 6: Serve

    Serve immediately while hot.


    Pro Tips for Best Results

    • Use fresh or fully thawed shrimp
    • Do not overcook
    • Cook garlic gently
    • Serve immediately


    Serving Suggestions for Gambas al Ajillo

    Serve with:

    • Crusty bread
    • Rice
    • Pasta
    • Salad

    This gambas al ajillo recipe pairs well with Mediterranean dishes like this Paella Valenciana for a complete meal.


    Nutritional Information (Approx. per serving)

    Calories: 300–400 kcal
    Protein: 20–25g
    Carbohydrates: 5–10g
    Fat: 20–25g
    Sodium: Moderate


    Storage and Reheating

    This dish is best served fresh.

    • Store up to 1 day
    • Reheat gently in a pan


    Frequently Asked Questions

    Can I use prawns instead of shrimp?

    Yes, they work well.

    Is this dish spicy?

    It has mild heat and can be adjusted.

    Can I skip wine?

    Yes, it is optional.


    How to Choose the Best Shrimp

    This gambas al ajillo recipe depends on high-quality shrimp.

    Large shrimp work best because they stay juicy and provide better texture. Fresh shrimp is ideal, but frozen shrimp can also be used if fully thawed and dried.

    Removing excess moisture helps the oil stay concentrated and flavorful.


    How to Infuse Maximum Garlic Flavor

    Garlic is the key to this gambas al ajillo recipe.

    Cooking garlic gently in olive oil releases its flavor without bitterness. The oil becomes infused and forms the base of the dish.

    Avoid high heat, as burned garlic can ruin the flavor.


    Balancing Oil, Heat, and Flavor

    This gambas al ajillo recipe relies on balance.

    Olive oil should be rich but not overwhelming. Chili adds mild heat, while lemon juice or wine adds brightness.

    Adjusting these elements allows you to control the final flavor.


    Variations You Can Try

    • Add mushrooms or tomatoes
    • Increase garlic for stronger flavor
    • Add chili for more heat
    • Serve over pasta or rice


    Common Mistakes to Avoid

    • Overcooking shrimp
    • Burning garlic
    • Using too much oil
    • Not serving immediately


    Make-Ahead and Storage Tips

    This gambas al ajillo recipe is best fresh but can be prepped ahead.

    • Clean shrimp in advance
    • Store up to 1–2 days
    • Reheat gently


    How to Turn This Into a Full Meal

    This gambas al ajillo recipe can easily become a full dinner.

    Serve it with rice, pasta, or bread to absorb the garlic oil. Adding vegetables or a simple salad helps balance the richness and creates a more complete plate.

    This approach allows you to transform a simple dish into a satisfying meal without extra complexity.


    Final Thoughts

    This gambas al ajillo recipe is a quick and flavorful way to enjoy garlic shrimp with minimal ingredients and effort.


    Related Recipes You’ll Love

    – Grilled Sardines
    – Paella Valenciana
    – Chicken Cacciatore


    Explore More Easy Dinner Recipes

    Discover more quick and simple meal ideas for any night:

    – Easy Dinner Recipes


    Author Note

    Dinners Recipe Team shares simple, reliable recipes designed for home cooks. Our goal is to make cooking easier while delivering flavorful, satisfying meals.

  • Pollo al Ajillo Recipe – Easy Tips for Garlic Chicken

    Pollo al Ajillo Recipe – Easy Tips for Garlic Chicken

    Pollo al ajillo recipe is a traditional Spanish dish made with tender chicken cooked in olive oil, garlic, and white wine. This pollo al ajillo recipe delivers bold, rustic flavor using simple ingredients and classic cooking techniques.

    This pollo al ajillo recipe focuses on slow cooking and balanced seasoning to create a rich, aromatic dish. The garlic becomes mellow and slightly sweet, blending with the chicken juices and olive oil to form a flavorful sauce that’s perfect for soaking up with bread or serving over rice.

    This dish is a classic example of Spanish cuisine, known for its use of garlic, olive oil, and simple, bold flavors.


    Table of Contents

    • Ingredients
    • How to Make Pollo al Ajillo Recipe
    • Pro Tips for Best Results
    • Serving Suggestions for Pollo al Ajillo
    • Nutritional Information
    • Frequently Asked Questions


    Why This Pollo al Ajillo Recipe Works

    This pollo al ajillo recipe is designed to create deep flavor with simple ingredients.

    • Garlic infuses the oil and chicken
    • Slow cooking keeps chicken tender
    • Olive oil creates a rich base
    • White wine balances the flavors


    Ingredients

    For the Chicken

    • 500 g chicken (bone-in pieces or boneless thighs)
    • Salt and pepper to taste

    For the Sauce

    • ¼ cup extra virgin olive oil
    • 8–10 cloves garlic (lightly crushed)
    • 1–2 dried red chilies (or ½ teaspoon chili flakes)
    • ½ cup white wine
    • 1 teaspoon paprika (optional)
    • 1 tablespoon lemon juice (optional)

    Garnish

    • 2 tablespoons fresh parsley (chopped)


    How to Make Pollo al Ajillo Recipe

    Step 1: Prepare the Chicken

    Season chicken with salt and pepper and let rest for 10–15 minutes.

    Step 2: Heat the Oil

    Heat olive oil in a large skillet over medium heat.

    Step 3: Brown the Chicken

    Cook chicken until golden brown on all sides. Remove and set aside.

    Step 4: Cook Garlic and Chili

    Add garlic and chilies and cook gently until fragrant.

    Step 5: Deglaze with Wine

    Pour in white wine and simmer to release flavor from the pan.

    Step 6: Cook Until Tender

    Return chicken, cover, and cook for 15–20 minutes until fully cooked.

    Step 7: Finish

    Add lemon juice and parsley, then cook briefly.

    Step 8: Serve

    Serve hot with your choice of sides.


    Pro Tips for Best Results

    • Use bone-in chicken for more flavor
    • Cook garlic gently to avoid bitterness
    • Brown chicken well before simmering
    • Adjust chili for spice level


    Serving Suggestions for Pollo al Ajillo

    Serve with:

    • Bread
    • Rice
    • Potatoes
    • Vegetables

    This pollo al ajillo recipe pairs well with simple dishes like Baked Chicken Breast for a complete meal.


    Nutritional Information (Approx. per serving)

    Calories: 350–450 kcal
    Protein: 30–35g
    Carbohydrates: 3–5g
    Fat: 22–28g
    Fiber: 0–1g
    Sodium: Moderate


    Storage and Reheating

    Store in the refrigerator for up to 2–3 days.

    For best results:

    • Reheat gently on the stove
    • Add a small amount of liquid if needed


    Frequently Asked Questions

    Can I use boneless chicken?

    Yes, it cooks faster and works well.

    Is this dish spicy?

    It has mild heat, but can be adjusted.

    Can I skip the wine?

    Yes, substitute with broth.

    What should I serve with it?

    Bread, rice, or vegetables work well.


    How to Build Deep Garlic Flavor

    This pollo al ajillo recipe depends on properly cooking the garlic.

    Garlic should be cooked slowly in olive oil to release its flavor without burning. When done correctly, it becomes soft, slightly sweet, and blends smoothly into the sauce.


    How to Keep Chicken Tender and Juicy

    This pollo al ajillo recipe uses gentle cooking to maintain texture.

    Cooking the chicken over moderate heat and allowing it to simmer ensures it stays tender. Overcooking or using high heat for too long can make it dry.


    Variations You Can Try

    • Add mushrooms for extra texture
    • Use chicken thighs for more flavor
    • Add extra herbs for variation
    • Increase chili for more heat


    Common Mistakes to Avoid

    • Burning the garlic
    • Not browning the chicken
    • Cooking on too high heat
    • Skipping the simmer step


    Make-Ahead and Storage Tips

    This pollo al ajillo recipe works well for preparing ahead.

    • Cook in advance
    • Store up to 3 days
    • Reheat gently


    How to Turn This Into a Complete Meal

    This pollo al ajillo recipe can easily become a full dinner.

    Serve with rice or potatoes along with vegetables to create a balanced plate. Bread is especially useful for soaking up the flavorful garlic sauce.


    Final Thoughts

    This pollo al ajillo recipe is simple, flavorful, and deeply satisfying, making it a great option for both everyday meals and special occasions.


    Related Recipes You’ll Love

    – Lemon Garlic Chicken
    – Garlic Butter Shrimp
    – Baked Chicken Breast


    Explore More Chicken Dinner Recipes

    Discover more easy and flavorful chicken dinner ideas below:

    – Chicken Dinner Recipes


    Explore More Easy Dinner Recipes

    Discover more quick and simple meal ideas for any night:

    – Easy Dinner Recipes


    Author Note

    Dinners Recipe Team shares simple, reliable recipes designed for home cooks. Our goal is to make cooking easier while delivering flavorful, satisfying meals.

  • Rabbit Paella Recipe (Paella de Conejo)

    Rabbit Paella Recipe (Paella de Conejo)

    Rabbit paella recipe is a traditional Spanish dish made with tender rabbit, saffron-infused rice, and fresh vegetables. This rabbit paella recipe delivers rich, authentic flavor and is perfect for those looking to experience classic Valencian cuisine at home.

    This rabbit paella recipe focuses on simple ingredients and proper technique to create a balanced dish with deep flavor. The combination of tender meat, seasoned rice, and the signature crispy bottom layer makes it both satisfying and unique.

    This dish is a classic example of Spanish paella, a cooking method known for its rich flavors and distinctive texture.


    Table of Contents

    • Ingredients
    • How to Make Rabbit Paella Recipe
    • Pro Tips for Best Results
    • Serving Suggestions for Rabbit Paella
    • Nutritional Information
    • Frequently Asked Questions


    Why This Rabbit Paella Recipe Works

    This rabbit paella recipe is designed to create authentic flavor and texture.

    • Rabbit adds depth and richness
    • Saffron enhances flavor and color
    • Rice absorbs broth for full flavor
    • Socarrat creates a crispy base


    Ingredients

    For the Paella

    • 2 cups short-grain rice (Bomba or Arborio)
    • 4 cups chicken or rabbit stock
    • 400 g rabbit (cut into small pieces)
    • 2 tablespoons olive oil
    • 1 large onion (chopped)
    • 4 cloves garlic (minced)
    • 2 medium tomatoes (grated)
    • 1 teaspoon smoked paprika
    • A pinch of saffron threads (soaked in warm water)
    • Salt and pepper to taste

    Vegetables

    • 1 cup green beans
    • ½ cup peas
    • 1 red bell pepper (sliced)

    For Serving

    • Lemon wedges


    How to Make Rabbit Paella Recipe

    Step 1: Brown the Rabbit

    Heat olive oil in a wide pan. Add rabbit and cook until browned on all sides.

    Step 2: Sauté Aromatics

    Add onion and cook until soft. Add garlic and cook briefly. Stir in tomatoes and cook until thickened.

    Step 3: Add Spices and Rice

    Add smoked paprika and mix well. Add rice and coat it in the mixture.

    Step 4: Add Broth and Saffron

    Pour in stock and saffron water. Season and spread evenly.

    Step 5: Add Vegetables

    Distribute vegetables evenly across the pan.

    Step 6: Cook Without Stirring

    Simmer on medium heat without stirring.

    Step 7: Create Socarrat

    Increase heat slightly at the end to form the crispy bottom layer.

    Step 8: Rest and Serve

    Let it rest for 5 minutes, then serve with lemon wedges.


    Pro Tips for Best Results

    • Use short-grain rice for best texture
    • Avoid stirring after adding broth
    • Cook on even heat
    • Let the dish rest before serving


    Serving Suggestions for Rabbit Paella

    Serve with:

    • Salad
    • Bread
    • Grilled vegetables

    This rabbit paella recipe pairs well with simple dishes like Lemon Garlic Chicken for a complete meal.


    Nutritional Information (Approx. per serving)

    Calories: 400–500 kcal
    Protein: 30–35g
    Carbohydrates: 45–50g
    Fat: 10–15g
    Fiber: 4–6g
    Sodium: Moderate


    Storage and Reheating

    Store in the refrigerator for up to 2–3 days.

    For best results:

    • Reheat gently
    • Add a small amount of broth if needed


    Frequently Asked Questions

    What does rabbit taste like?

    It is mild and slightly gamey, similar to chicken.

    Can I substitute rabbit?

    Yes, chicken works well.

    What rice is best?

    Short-grain rice like Bomba.

    How do I get crispy bottom?

    Increase heat at the end and avoid stirring.

    Can I make it ahead?

    It is best served fresh but can be reheated.


    How to Get Authentic Paella Texture

    Rabbit paella recipe depends on proper cooking technique.

    Cooking without stirring allows the rice to develop the correct texture. The liquid should be absorbed gradually while the rice cooks evenly.


    How to Achieve Perfect Socarrat

    This rabbit paella recipe includes the signature crispy base.

    Increasing the heat at the end of cooking creates a slightly crispy layer at the bottom. This adds both texture and flavor.


    Variations You Can Try

    • Use chicken instead of rabbit
    • Add seafood for variation
    • Use different vegetables
    • Adjust seasoning


    Common Mistakes to Avoid

    • Stirring after adding broth
    • Using too much liquid
    • Cooking on uneven heat
    • Overcooking the meat


    Make-Ahead and Storage Tips

    This rabbit paella recipe is best served fresh.

    • Prepare ingredients ahead
    • Store leftovers up to 2 days
    • Reheat gently


    How to Turn This Into a Complete Meal

    This rabbit paella recipe can easily become a full dinner.

    Serve with vegetables or salad to balance the dish. Adding bread helps complete the meal and enhances the overall experience.


    Final Thoughts

    This rabbit paella recipe is rich, authentic, and full of flavor, making it a great option for anyone looking to enjoy traditional Spanish cuisine at home.


    Related Recipes You’ll Love

    – Chicken Chow Mein
    – Garlic Butter Steak Bites
    – Lemon Garlic Chicken
    – Cordero Asado


    Explore More Easy Dinner Recipes

    Discover more quick and simple meal ideas for any night:

    – Easy Dinner Recipes


    Author Note

    Dinners Recipe Team shares simple, reliable recipes designed for home cooks. Our goal is to make cooking easier while delivering flavorful, satisfying meals.

  • Chorizo Stew Recipe

    Chorizo Stew Recipe

    Chorizo stew recipe is a rich and hearty dish made with smoky chorizo, vegetables, and a flavorful broth. This chorizo stew recipe delivers bold flavor and a comforting texture, making it perfect for both quick dinners and meal prep.

    This chorizo stew recipe focuses on building flavor from simple ingredients. As the chorizo cooks, it releases oils infused with spices that form the base of the stew, creating a deep and satisfying dish.

    This dish is a classic example of Spanish cuisine, known for its bold flavors and rustic cooking style.


    Table of Contents

    • Ingredients
    • How to Make Chorizo Stew Recipe
    • Pro Tips for Best Results
    • Serving Suggestions for Chorizo Stew
    • Nutritional Information
    • Frequently Asked Questions


    Why This Chorizo Stew Recipe Works

    This chorizo stew recipe is designed to create a rich and balanced dish.

    • Chorizo adds smoky flavor
    • Vegetables provide texture
    • Broth creates depth
    • Simple ingredients build strong taste


    Ingredients

    For the Stew

    • 200 g chorizo sausage (sliced)
    • 2 tablespoons olive oil
    • 1 large onion (chopped)
    • 4 cloves garlic (minced)
    • 2 medium potatoes (cubed)
    • 1 cup cooked beans (white or kidney beans)
    • 2 medium tomatoes (chopped) or 1 cup canned tomatoes
    • 1 teaspoon smoked paprika
    • ½ teaspoon black pepper
    • Salt to taste
    • 3 cups chicken or vegetable broth
    • 1 carrot (sliced)
    • 1 red bell pepper (chopped)

    Garnish

    • 2 tablespoons fresh parsley (chopped)


    How to Make Chorizo Stew Recipe

    Step 1: Cook the Chorizo

    Heat oil in a pot and cook chorizo until slightly crispy. Remove and set aside.

    Step 2: Sauté the Base

    Cook onions until soft, then add garlic and sauté briefly.

    Step 3: Add Vegetables

    Add potatoes, carrots, and bell peppers. Stir well.

    Step 4: Build the Stew

    Add tomatoes, paprika, pepper, and salt. Cook until tomatoes soften.

    Step 5: Add Broth and Simmer

    Add broth and simmer for 15–20 minutes until potatoes are tender.

    Step 6: Add Beans and Chorizo

    Return chorizo and add beans. Simmer for another 5–10 minutes.

    Step 7: Serve

    Garnish and serve hot.


    Pro Tips for Best Results

    • Use cured chorizo for best flavor
    • Adjust seasoning carefully
    • Let stew rest before serving
    • Mash potatoes slightly for thickness


    Serving Suggestions for Chorizo Stew

    Serve with:

    • Bread
    • Rice
    • Vegetables
    • Salad

    This chorizo stew recipe pairs well with dishes like Pollo al Ajillo for a complete meal.


    Nutritional Information (Approx. per serving)

    Calories: 400–500 kcal
    Protein: 18–22g
    Carbohydrates: 35–40g
    Fat: 20–25g
    Fiber: 6–8g
    Sodium: Moderate to high


    Storage and Reheating

    Store in the refrigerator for up to 3 days.

    For best results:

    • Reheat gently
    • Add a small amount of broth if needed


    Frequently Asked Questions

    Can I use fresh chorizo?

    Yes, cook it fully before continuing.

    Can I make it vegetarian?

    Yes, substitute chorizo with plant-based options.

    How long can I store it?

    Up to 3 days refrigerated.

    Can I freeze it?

    Yes, freeze up to 1 month.

    What should I serve with it?

    Bread, rice, or potatoes.


    How to Build Deep Flavor in Chorizo Stew

    Chorizo stew recipe relies on the chorizo itself.

    As it cooks, it releases oils that flavor the entire dish. Cooking the base ingredients in this oil helps create a rich and well-developed taste.


    How to Get the Right Stew Consistency

    This chorizo stew recipe should have a balanced texture.

    Simmering allows the broth to thicken slightly. Mashing a few potatoes can help create a thicker consistency without adding extra ingredients.


    Variations You Can Try

    • Add chickpeas or lentils
    • Use different vegetables
    • Adjust spice levels
    • Add extra herbs


    Common Mistakes to Avoid

    • Skipping the browning step
    • Adding too much liquid
    • Overcooking vegetables
    • Not seasoning properly


    Make-Ahead and Storage Tips

    This chorizo stew recipe is ideal for planning ahead.

    • Prepare in advance
    • Store up to 3 days
    • Reheat gently


    How to Turn This Into a Complete Meal

    This chorizo stew recipe can easily become a full dinner.

    Serve with grains or vegetables to create a balanced plate. Bread can help absorb the flavorful broth and enhance the meal.


    Final Thoughts

    This chorizo stew recipe is simple, hearty, and full of flavor, making it a dependable option for any meal.


    Related Recipes You’ll Love

    – Pollo al Ajillo
    – Albóndigas
    – Chicken Cacciatore


    Explore More Easy Dinner Recipes

    Discover more quick and simple meal ideas for any night:

    – Easy Dinner Recipes


    Author Note

    Dinners Recipe Team shares simple, reliable recipes designed for home cooks. Our goal is to make cooking easier while delivering flavorful, satisfying meals.

  • Albóndigas Recipe – Spanish Meatballs in Tomato Sauce

    Albóndigas Recipe – Spanish Meatballs in Tomato Sauce

    Albóndigas recipe is a traditional Spanish dish made with tender meatballs simmered in a rich tomato-based sauce. This albóndigas recipe delivers warm, comforting flavor using simple ingredients like garlic, paprika, olive oil, and herbs.

    This albóndigas recipe focuses on creating soft, juicy meatballs and a balanced sauce that coats them well without becoming too heavy. It’s a versatile dish that works for both casual meals and shared plates.

    This dish is a classic example of Spanish cuisine, known for its bold flavors and rustic cooking style.


    Table of Contents

    • Ingredients
    • How to Make Albóndigas Recipe
    • Pro Tips for Best Results
    • Serving Suggestions for Albóndigas
    • Nutritional Information
    • Frequently Asked Questions


    Why This Albóndigas Recipe Works

    This albóndigas recipe is designed to create tender meatballs with rich flavor.

    • Breadcrumbs and milk keep meatballs soft
    • Browning adds depth of flavor
    • Simmering keeps meatballs moist
    • Sauce develops a balanced consistency


    Ingredients

    For the Meatballs

    • 500 g ground meat (beef, pork, or a mix)
    • 2 cloves garlic (minced)
    • 1 small onion (finely chopped)
    • 1 egg
    • ½ cup breadcrumbs
    • 2 tablespoons milk
    • 2 tablespoons parsley (chopped)
    • 1 teaspoon paprika
    • Salt and pepper to taste

    For the Sauce

    • 2 tablespoons olive oil
    • 3 cloves garlic (minced)
    • 1 onion (chopped)
    • 2 cups tomato puree or crushed tomatoes
    • 1 teaspoon smoked paprika
    • ½ teaspoon cumin (optional)
    • 1 cup chicken or vegetable broth
    • Salt and pepper to taste

    Garnish

    • Fresh parsley
    • Lemon wedges (optional)


    How to Make Albóndigas Recipe

    Step 1: Make the Meatball Mixture

    Combine all meatball ingredients and mix gently until just combined.

    Step 2: Shape the Meatballs

    Form small meatballs about 1–1½ inches wide.

    Step 3: Brown the Meatballs

    Heat oil and brown meatballs on all sides. Remove and set aside.

    Step 4: Make the Sauce

    Cook onion until soft, then add garlic, tomatoes, spices, broth, salt, and pepper.

    Step 5: Simmer

    Return meatballs to the sauce and simmer for 15–20 minutes until tender.

    Step 6: Serve

    Garnish and serve hot.


    Pro Tips for Best Results

    • Do not overmix the meat
    • Use a mix of meats for better flavor
    • Brown meatballs before simmering
    • Let them rest in the sauce before serving


    Serving Suggestions for Albóndigas

    Serve with:

    • Rice
    • Bread
    • Potatoes
    • Vegetables

    This albóndigas recipe pairs well with dishes like Pollo al Ajillo for a complete meal.


    Nutritional Information (Approx. per serving)

    Calories: 400–500 kcal
    Protein: 25–30g
    Carbohydrates: 15–20g
    Fat: 20–25g
    Sodium: Moderate


    Storage and Reheating

    Store in an airtight container in the refrigerator for up to 3 days.

    For best results:

    • Reheat gently in a pan
    • Add extra sauce or broth if needed


    Frequently Asked Questions

    Can I bake the meatballs?

    Yes, bake at 180°C for about 20 minutes.

    Can I use chicken or turkey?

    Yes, but flavor will be lighter.

    How do I keep meatballs soft?

    Use breadcrumbs and milk and avoid overmixing.

    Can I freeze them?

    Yes, freeze with or without sauce.


    How to Keep Meatballs Tender and Juicy

    Albóndigas recipe depends on proper texture.

    Using breadcrumbs and milk helps retain moisture, creating a softer texture. Mixing gently prevents the meatballs from becoming dense.


    How to Build a Rich Sauce

    This albóndigas recipe uses simple ingredients for depth.

    Cooking onions and garlic first creates a strong base. Tomato puree and broth balance the consistency, while spices enhance flavor.


    Variations You Can Try

    • Use chicken or turkey
    • Add olives or herbs
    • Try almond-based sauce
    • Adjust spice levels


    Common Mistakes to Avoid

    • Overmixing the meat
    • Cooking at too high heat
    • Using too much liquid
    • Skipping simmer time


    Make-Ahead and Storage Tips

    This albóndigas recipe works well for planning ahead.

    • Prepare in advance
    • Store up to 3 days
    • Reheat gently


    How to Turn This Into a Complete Meal

    This albóndigas recipe can easily become a full dinner.

    Serve with grains or vegetables to create a balanced meal. Bread is also useful for soaking up the sauce.


    Final Thoughts

    This albóndigas recipe is simple, flavorful, and dependable, making it a great option for both everyday meals and shared dishes.


    Related Recipes You’ll Love

    – Pollo al Ajillo
    – Chicken Cacciatore
    – Garlic Butter Steak Bites


    Explore More Easy Dinner Recipes

    Discover more quick and simple meal ideas for any night:

    – Easy Dinner Recipes


    Author Note

    Dinners Recipe Team shares simple, reliable recipes designed for home cooks. Our goal is to make cooking easier while delivering flavorful, satisfying meals.

  • Bacalao a la Vizcaína Recipe (Codfish Stew)

    Bacalao a la Vizcaína Recipe (Codfish Stew)

    Bacalao a la vizcaína recipe is a traditional Spanish dish made with salt cod simmered in a rich red pepper and tomato sauce. This bacalao a la vizcaína recipe delivers deep, savory flavor and is perfect for those looking to experience authentic Basque cuisine.

    This bacalao a la vizcaína recipe focuses on slow cooking and layering ingredients to create a smooth, balanced sauce. The cod absorbs the flavor of the sauce while maintaining its tender, flaky texture, making this dish both comforting and impressive.

    This dish is a classic example of Spanish cuisine, known for its bold flavors and traditional cooking techniques.


    Table of Contents

    • Ingredients
    • How to Make Bacalao a la Vizcaína Recipe
    • Pro Tips for Best Results
    • Serving Suggestions for Bacalao a la Vizcaína
    • Nutritional Information
    • Frequently Asked Questions


    Why This Bacalao a la Vizcaína Recipe Works

    This bacalao a la vizcaína recipe is designed to create rich flavor and balanced texture.

    • Slow-cooked onions build sweetness
    • Pepper-based sauce adds depth
    • Cod absorbs flavor while staying tender
    • Blending creates a smooth consistency


    Ingredients

    For the Cod

    • 400 g salted cod (bacalao)
    • Water (for soaking/desalting)

    For the Sauce

    • 3 tablespoons olive oil
    • 2 large onions (thinly sliced)
    • 5–6 cloves garlic (chopped)
    • 3 dried red peppers (or ñora peppers)
    • 2 medium tomatoes (chopped) or 1 cup canned tomatoes
    • 1 slice bread (optional)
    • 1 teaspoon paprika
    • Salt (use carefully)
    • 1–2 cups fish or vegetable broth

    Garnish

    • Fresh parsley
    • Olive oil drizzle


    How to Make Bacalao a la Vizcaína Recipe

    Step 1: Desalt the Cod

    Rinse cod and soak in water for 24–48 hours, changing water regularly. Drain and portion.

    Step 2: Prepare the Peppers

    Soak dried peppers until soft, then remove pulp.

    Step 3: Cook the Base

    Cook onions slowly in olive oil until soft and lightly caramelized.

    Step 4: Add Garlic and Tomatoes

    Add garlic, cook briefly, then add tomatoes and cook until thickened.

    Step 5: Build the Sauce

    Add pepper pulp, paprika, bread (if using), and broth. Simmer for 10 minutes.

    Step 6: Blend the Sauce

    Blend until smooth and return to the pan.

    Step 7: Cook the Cod

    Add cod to the sauce and simmer gently for 10–15 minutes until tender.

    Step 8: Serve

    Garnish and serve warm.


    Pro Tips for Best Results

    • Properly desalt the cod
    • Cook onions slowly for sweetness
    • Avoid overcooking the fish
    • Blend sauce until smooth


    Serving Suggestions for Bacalao a la Vizcaína

    Serve with:

    • Bread
    • Potatoes
    • Rice
    • Vegetables

    This bacalao a la vizcaína recipe pairs well with dishes like Pollo al Ajillo for a complete meal.


    Nutritional Information (Approx. per serving)

    Calories: 300–400 kcal
    Protein: 30–35g
    Carbohydrates: 10–15g
    Fat: 12–18g
    Fiber: 2–4g
    Sodium: Varies


    Storage and Reheating

    Store in the refrigerator for up to 2–3 days.

    For best results:

    • Reheat gently
    • Add a small amount of liquid if needed


    Frequently Asked Questions

    What is bacalao?

    Salt-cured codfish used in many dishes.

    Can I use fresh cod?

    Yes, but flavor will be milder.

    What can I use instead of ñora peppers?

    Dried red peppers or roasted peppers.

    How long can I store it?

    Up to 2–3 days refrigerated.

    What should I serve with it?

    Bread, potatoes, or rice.


    How to Build a Rich Vizcaína Sauce

    Bacalao a la vizcaína recipe depends on slow cooking.

    Cooking onions slowly creates sweetness, while peppers and tomatoes build depth. Blending the sauce ensures a smooth and balanced texture.


    How to Keep Cod Tender and Flaky

    This bacalao a la vizcaína recipe requires gentle cooking.

    Cod should be simmered on low heat and handled carefully to prevent breaking. Overcooking can make it dry.


    Variations You Can Try

    • Use fresh cod
    • Add extra vegetables
    • Adjust spice levels
    • Use different peppers


    Common Mistakes to Avoid

    • Not desalting cod properly
    • Cooking onions too quickly
    • Overcooking the fish
    • Using too much salt


    Make-Ahead and Storage Tips

    This bacalao a la vizcaína recipe works well for preparing ahead.

    • Prepare in advance
    • Store up to 3 days
    • Reheat gently


    How to Turn This Into a Complete Meal

    This bacalao a la vizcaína recipe can easily become a full dinner.

    Serve with potatoes or rice along with vegetables to create a balanced meal. Bread can help absorb the sauce and enhance the dish.


    Final Thoughts

    This bacalao a la vizcaína recipe is rich, traditional, and full of flavor, making it a great option for anyone looking to explore authentic Spanish cooking.


    Related Recipes You’ll Love

    – Pollo al Ajillo
    – Albóndigas
    – Chicken Cacciatore


    Explore More Easy Dinner Recipes

    Discover more quick and simple meal ideas for any night:

    – Easy Dinner Recipes


    Author Note

    Dinners Recipe Team shares simple, reliable recipes designed for home cooks. Our goal is to make cooking easier while delivering flavorful, satisfying meals.

  • Pulpo a la Gallega Recipe (Octopus)

    Pulpo a la Gallega Recipe (Octopus)

    Pulpo a la Gallega recipe is a traditional Spanish dish made with tender octopus, potatoes, olive oil, and smoked paprika. This pulpo a la Gallega recipe delivers simple yet bold flavor, combining soft octopus with creamy potatoes and a rich seasoning.

    This pulpo a la Gallega recipe focuses on proper cooking technique to achieve tender octopus and balanced flavor. With minimal ingredients, it highlights texture and quality, making it a classic dish that is both rustic and refined.

    This dish is a classic example of Spanish cuisine, known for its simplicity and bold flavors.


    Table of Contents

    • Ingredients
    • How to Make Pulpo a la Gallega Recipe
    • Pro Tips for Best Results
    • Serving Suggestions for Pulpo a la Gallega
    • Nutritional Information
    • Frequently Asked Questions


    Why This Pulpo a la Gallega Recipe Works

    This pulpo a la Gallega recipe is designed to create a balanced and flavorful dish.

    • Octopus becomes tender with proper cooking
    • Potatoes absorb flavor
    • Olive oil adds richness
    • Paprika provides depth and aroma


    Ingredients

    For the Dish

    • 1 whole octopus (about 1–1.2 kg, cleaned)
    • 3–4 medium potatoes (peeled and sliced)
    • 3 tablespoons extra virgin olive oil
    • 1–2 teaspoons smoked paprika
    • Coarse sea salt to taste
    • Water for boiling


    How to Make Pulpo a la Gallega Recipe

    Step 1: Prepare the Octopus

    If fresh, freeze and thaw the octopus to help tenderize it.

    Step 2: Boil the Octopus

    Bring water to a boil. Dip the octopus into the water 2–3 times, then fully submerge.

    Step 3: Cook Until Tender

    Simmer for 35–45 minutes until tender.

    Step 4: Cook the Potatoes

    Cook potatoes in the same water until soft.

    Step 5: Slice the Octopus

    Cut into bite-sized pieces.

    Step 6: Assemble

    Arrange potatoes on a plate and top with octopus.

    Step 7: Season and Serve

    Drizzle olive oil, sprinkle paprika, and add salt. Serve warm.


    Pro Tips for Best Results

    • Freeze octopus before cooking
    • Do not salt boiling water
    • Use high-quality olive oil
    • Cook until just tender


    Serving Suggestions for Pulpo a la Gallega

    Serve with:

    • Bread
    • Salad
    • Vegetables

    This pulpo a la Gallega recipe pairs well with dishes like Bacalao a la Vizcaína for a complete meal.


    Nutritional Information (Approx. per serving)

    Calories: 250–300 kcal
    Protein: 25–30g
    Carbohydrates: 15–20g
    Fat: 10–14g
    Fiber: 2–3g
    Sodium: Moderate


    Storage and Reheating

    Store in the refrigerator for up to 2 days.

    For best results:

    • Reheat gently
    • Avoid overcooking


    Frequently Asked Questions

    Why dip the octopus before cooking?

    It helps maintain texture and shape.

    Can I use frozen octopus?

    Yes, it is often more tender.

    What does it taste like?

    Mild and slightly sweet with smoky flavor.

    Can I grill it?

    Yes, after boiling.

    What should I serve with it?

    Bread, salad, or vegetables.


    How to Get Tender Octopus

    Pulpo a la Gallega recipe depends on proper technique.

    Freezing and slow simmering helps break down the fibers, making the octopus tender. Cooking time should be controlled to avoid toughness.


    How to Build Flavor with Simple Ingredients

    This pulpo a la Gallega recipe uses minimal ingredients.

    Olive oil adds richness, paprika adds depth, and salt enhances natural flavors. Together, they create a balanced and traditional dish.


    Variations You Can Try

    • Add extra paprika for more flavor
    • Grill after boiling
    • Use different potatoes
    • Adjust seasoning


    Common Mistakes to Avoid

    • Overcooking octopus
    • Adding salt too early
    • Skipping dipping step
    • Using low-quality oil


    Make-Ahead and Storage Tips

    This pulpo a la Gallega recipe is best served fresh.

    • Prepare in advance
    • Store up to 2 days
    • Reheat gently


    How to Turn This Into a Complete Meal

    This pulpo a la Gallega recipe can easily become a full dinner.

    Serve with vegetables or bread to create a balanced meal. Adding sides enhances both flavor and texture.


    Final Thoughts

    This pulpo a la Gallega recipe is simple, flavorful, and authentic, making it a great option for anyone looking to explore traditional Spanish cuisine.


    Related Recipes You’ll Love

    – Bacalao a la Vizcaína
    – Chorizo Stew
    – Albóndigas


    Explore More Easy Dinner Recipes

    Discover more quick and simple meal ideas for any night:

    – Easy Dinner Recipes


    Author Note

    Dinners Recipe Team shares simple, reliable recipes designed for home cooks. Our goal is to make cooking easier while delivering flavorful, satisfying meals.

  • Croquetas de Jamón Recipe (Ham Croquettes)

    Croquetas de Jamón Recipe (Ham Croquettes)

    Croquetas de jamón recipe is a classic Spanish tapas dish made with a creamy béchamel filling and crispy breadcrumb coating. This croquetas de jamón recipe delivers a perfect contrast of textures, with a crunchy exterior and a soft, rich interior.

    This croquetas de jamón recipe focuses on creating a thick, smooth filling that holds its shape while remaining creamy inside. With simple ingredients and proper technique, it produces a reliable and flavorful appetizer or snack.

    This dish is a classic example of Spanish cuisine, known for its bold flavors and rustic cooking traditions.


    Table of Contents

    • Ingredients
    • How to Make Croquetas de Jamón Recipe
    • Pro Tips for Best Results
    • Serving Suggestions for Croquetas de Jamón
    • Nutritional Information
    • Frequently Asked Questions


    Why This Croquetas de Jamón Recipe Works

    This croquetas de jamón recipe is designed to create the perfect texture and flavor.

    • Béchamel creates a creamy center
    • Ham adds rich, savory flavor
    • Breadcrumb coating provides crispness
    • Chilling ensures proper shaping


    Ingredients

    For the Filling

    • 4 tablespoons butter
    • 4 tablespoons all-purpose flour
    • 2 cups milk (warm)
    • 100 g cured ham (finely chopped)
    • 1 small onion (finely chopped)
    • Salt and pepper to taste
    • Pinch of nutmeg (optional)

    For Coating

    • 2 eggs (beaten)
    • 1 cup breadcrumbs
    • Oil for frying


    How to Make Croquetas de Jamón Recipe

    Step 1: Prepare the Base

    Melt butter and cook onion until soft.

    Step 2: Make the Béchamel

    Add flour and cook briefly. Gradually add milk while stirring to create a smooth mixture.

    Step 3: Add Ham and Seasoning

    Add ham, salt, pepper, and nutmeg. Cook until thick and smooth.

    Step 4: Chill the Mixture

    Transfer to a tray, cover, and refrigerate until firm.

    Step 5: Shape the Croquettes

    Form into small cylinders or balls.

    Step 6: Coat

    Dip in egg, then coat with breadcrumbs.

    Step 7: Fry

    Fry until golden and crispy.

    Step 8: Serve

    Serve hot.


    Pro Tips for Best Results

    • Cook béchamel until thick
    • Chill thoroughly before shaping
    • Use fine breadcrumbs
    • Fry in batches


    Serving Suggestions for Croquetas de Jamón

    Serve with:

    • Aioli
    • Tomato sauce
    • Salad
    • Tapas dishes

    This croquetas de jamón recipe pairs well with dishes like Albóndigas for a complete meal.


    Nutritional Information (Approx. per serving)

    Calories: 250–300 kcal
    Protein: 8–12g
    Carbohydrates: 20–25g
    Fat: 15–18g
    Fiber: 1–2g
    Sodium: Moderate


    Storage and Reheating

    Store in the refrigerator for up to 2 days.

    For best results:

    • Reheat in oven
    • Avoid microwave for crispness


    Frequently Asked Questions

    Can I bake instead of fry?

    Yes, but texture will differ.

    Can I use other fillings?

    Yes, chicken, fish, or vegetables.

    Why is mixture too soft?

    It needs more cooking or chilling.

    Can I freeze them?

    Yes, freeze before frying.

    What to serve with them?

    Dips or as part of a tapas spread.


    How to Get a Perfect Creamy Filling

    Croquetas de jamón recipe depends on béchamel consistency.

    Cooking flour and butter properly and adding milk gradually ensures a smooth, thick filling that holds its shape after chilling.


    How to Achieve Crispy Coating

    This croquetas de jamón recipe requires proper coating technique.

    Even coating with egg and breadcrumbs ensures a crisp exterior when fried. Maintaining oil temperature prevents sogginess.


    Variations You Can Try

    • Add cheese
    • Use chicken or fish
    • Add herbs
    • Adjust seasoning


    Common Mistakes to Avoid

    • Thin béchamel
    • Skipping chilling step
    • Overcrowding pan
    • Incorrect oil temperature


    Make-Ahead and Storage Tips

    This croquetas de jamón recipe is ideal for planning ahead.

    • Prepare filling in advance
    • Store shaped croquettes
    • Fry when ready


    How to Turn This Into a Complete Meal

    This croquetas de jamón recipe can easily be part of a full meal.

    Serve with vegetables or salad along with other small dishes to create a balanced meal.


    Final Thoughts

    This croquetas de jamón recipe is crispy, creamy, and full of flavor, making it a perfect appetizer or snack for any occasion.


    Related Recipes You’ll Love

    – Albóndigas
    – Chorizo Stew
    – Pollo al Ajillo
    – Tapas Platter


    Explore More Easy Dinner Recipes

    Discover more quick and simple meal ideas for any night:

    – Easy Dinner Recipes


    Author Note

    Dinners Recipe Team shares simple, reliable recipes designed for home cooks. Our goal is to make cooking easier while delivering flavorful, satisfying meals.